Everyone has at some time encountered a computer that is slow and takes a long time to respond. It can even get stuck with several programs at the same time. In fact, a slow running computer has become a common issue for most of us. You should ask yourself what causes these slowness and how to solve this problem. Why is Windows 10 slow? This can be due to many reasons. The following list gives you all the clues to understand this problem on Windows 10 and how to solve it.
1. Slow Windows 10: Shutting down and restarting Windows
The first thing you should think about when Windows 10 is slow is shutting down and restarting your computer. Many problems are solved with this very simple action. It eliminates any excessive RAM usage that can’t be eliminated otherwise. It also kills processes that you may have started that are no longer needed, but are still running and slowing down your system. If your PC has become slow over time for no apparent reason, you will be surprised at how much faster it will run if you do this.
2. Clean up your hard drive
If your hard drive is cluttered with files you don’t need, your PC may be slow. Cleaning it up can help you gain speed. Windows 10 has a built-in tool called Storage Sense. Go to Settings > System > Storage and, at the top of the screen, enable the feature. When you do this, Windows constantly monitors your PC and deletes old, unnecessary files that you no longer need. Temporary files, files in the Downloads folder that have not been modified for a month and old files in the Recycle Bin will be deleted.
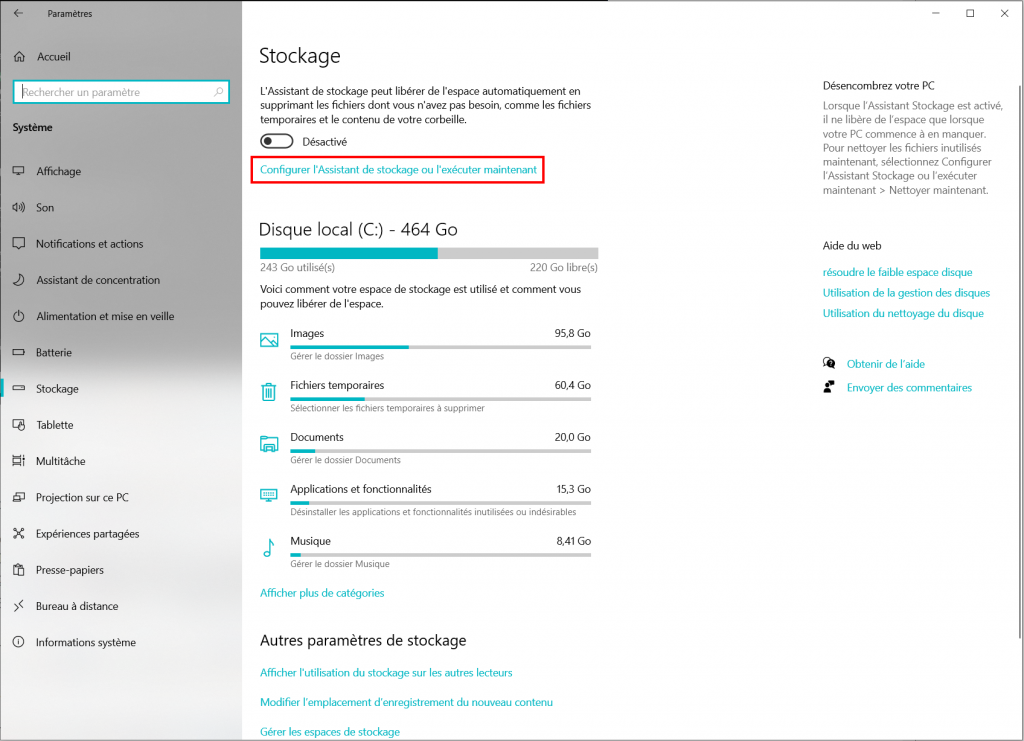
You can also remove older versions of Windows that may be taking up space. At the bottom of the screen, check the box next to “Remove older versions of Windows”. The Storage Assistant will then remove older versions of Windows ten days after an upgrade is installed. Note that if you do this, you will not be able to revert to the old version of Windows.
If you would like more information on the Storage Assistant, you can see how to clean up your PC on Windows 10.
3. Slow Windows 10: clean your registry
On Windows, the registry tracks and controls just about everything about the way Windows works and looks. This includes information about where your programs are located, what DLLs they use and share, what types of files should be opened by what program, and just about everything else.
But the registry is a very messy thing. When you uninstall a program, for example, the settings for that program are not always cleaned up in the registry. So, over time, it can become filled with countless obsolete settings of all kinds. And this can lead to system slowdowns.
Cleaning the registry cannot be done manually. You need software to do this. One of the most popular tools is CCleaner. It has a free version that will do the job of cleaning the registry.
4. Change your power settings
If you use the Windows 10 Power Save plan, you are slowing down your PC. This plan reduces the performance of your PC to save energy. Even desktop PCs usually have a “Power Saver” plan. If you change your power plan from “Power Saver” to “High Performance” or “Balanced”, you will get an instant performance boost.
To do this, go to Control Panel/All Control Panels/Power Options. You will usually see two options: “Balanced (recommended)” and “Power Saver“. Depending on your brand and model, you may see other plans here too, including some marked by the manufacturer. To see the “High Performance” setting, click on the down arrow next to “Show additional plans”.
To change your power setting, simply choose the one you want, then exit the Control Panel. High Performance” is the best performing option, but uses the most power. The “Balanced” option strikes a balance between power consumption and best performance. The “Power Saver” option does everything it can to give you the most battery life. Desktop users have no reason to choose “Power Saver”, and even laptop users should consider the “Balanced” option when unplugged – and “High Performance” when connected to a power source.
5. Disable programs that run at startup
One of the reasons why your PC on Windows 10 may seem slow is that you have too many programs running in the background. Stop them from running, and your PC will run more smoothly.
Start by launching Task Manager: right-click on a free area of the taskbar and select Task Manager. If the Task Manager launches as a compact application without a tab, click on ‘More details’ at the bottom of the window. The Task Manager will then appear with tabs. Click on the Startup tab. You will see a list of programs and services that start when you start Windows. The list includes the name of each program as well as its publisher, whether or not it is enabled to run at startup, and its “startup impact“, i.e. the extent to which it slows down Windows 10 when the system starts.
To prevent a program or service from launching at startup, right-click on it and select “Disable“. This does not disable the program entirely; it only prevents it from launching at startup. You can still run the application after it has started. Also, if you decide later to run the application at startup, simply return to this area of the Task Manager, right-click on the application and select Enable.

The Task Manager helps you get information about unfamiliar programs. Right-click on an item and select “Properties” to get more information about it, including its location on your hard drive, whether it has a digital signature, and other information such as version number, file size, and the last time it was modified.
6. Stop Windows tips and tricks
When you use your Windows 10 PC, Windows keeps an eye on what you’re doing and offers you tips on what you could be doing with the operating system. The fact that Windows is watching what you do and giving you tips can also make your PC slower. If you want to speed things up, tell Windows to stop giving you tips.
To do this, click the Start button, select the Settings icon, and then go to System > Notifications and Actions. Scroll down to the Notifications section and uncheck the “Get tips, tricks, and suggestions when using Windows” box.

7. Disable search indexing
Windows 10 indexes your hard drive in the background, allowing you to search your PC faster than if no indexing was performed. But slower PCs that use indexing can experience a drop in performance. You can give them a boost by turning off indexing. Even if you have an SSD, turning off indexing can improve your speed. This is because the constant writing to the drive by indexing can end up slowing down SSDs.
To get the most out of Windows 10, you should disable indexing completely. To do this, type services.msc in the Windows 10 search box and press Enter. The Services application appears. Scroll down until you find the indexing service. Double-click it, and in the screen that appears, click Stop. Then restart your computer. Your searches may be slightly slower, but you may not notice the difference. You should experience a general improvement in performance.
If you wish, you can disable indexing only for files in certain locations. To do this, type index in Windows 10 search and click the Indexing Options result that appears. The Indexing Options page of the Control Panel appears. Click the Edit button, and you will see a list of locations that are indexed, such as Microsoft Outlook. Uncheck the boxes for locations that you find indexing is not necessary.
8. Disabling shadows, animations and visual effects
Windows 10 offers some very nice visual effects such as shadows and animations. On fast, newer PCs, they don’t usually affect system performance. But on slower, older PCs, they can have an impact on performance.
It’s easy to disable them. In the Windows 10 search box, type sysdm.cpl and press Enter. This launches the System Properties dialog box. Click the Advanced System Settings tab, then click Settings in the Performance section. This brings up the Performance Options dialog box, which will show a varied list of animations and special effects.
Choose to enable or disable certain options. Here are the animations and special effects you will probably want to disable, as they have the greatest impact on system performance:
- Animate controls and items inside windows
- Animating windows when they are minimised and maximised
- Fading or dragging menus
- Animations in the taskbar
- Make tooltips disappear or appear
- Make menu items disappear after a click
- Show shadows under windows

However, it’s probably much easier to select “Adjust for better performance” at the top of the screen, then click OK. Windows 10 will then disable the effects that are slowing down your system.
9. Disable transparency
As well as disabling shadows, animations and visual effects, you should also disable the transparency effects that Windows 10 uses for the Start menu, taskbar and Action Centre. It takes a surprising amount of work for Windows to create these transparency effects, and disabling them can make a difference to system performance.
To do this, from Settings, choose Customise > Colours, scroll down to ‘Transparency effects’ and move the slider to Disabled.

10. Slow Windows 10: consider enabling automatic Windows maintenance
Every day, Windows 10 performs maintenance on your PC. It runs security scans and system diagnostics to make sure everything is in order and automatically fixes problems if it finds any. This ensures that your PC is running at peak performance. By default, this automatic maintenance runs every day at 2am, as long as your device is connected to a power source.
However, it is possible that the function has been accidentally disabled or that your PC has not been plugged in for some time and maintenance has not been performed. You can make sure it is enabled and running every day, and run it manually if you wish.
Go to Control PanelAll Control PanelsSecurity and Maintenance. In the Maintenance section, under Automatic Maintenance, click ‘Start Maintenance’ if you want it to run now. To ensure that it runs every day, click ‘Change maintenance settings’ and on the screen that appears, select the time you want maintenance to run and check the ‘Allow scheduled maintenance to wake my computer at the scheduled time’ box. Then click OK.

11. Remove bloatware
Sometimes the biggest factor in slowing down your PC is not Windows 10 itself, but bloatware or adware that hogs processor and system resources. Adware and bloatware are particularly insidious as they may have been installed by the manufacturer of your computer.
First, run a system scan for adware and malware. You can use Windows 10’s built-in anti-malware application. Just type Windows Defender in the search field, press Enter, and then click Scan Now. Windows Defender scans for malware and removes any it finds.
It may be necessary to use third-party software, such as Malwarebytes Anti-Malware. The free version scans for malware and removes any it finds. The paid version offers permanent protection to prevent infections as soon as they appear.
12. Use ReadyBoost to speed up disk caching
Windows 10 regularly stores cached data on your hard drive. When it needs this data, it fetches it from there. The time it takes to retrieve cached data depends on the speed of your hard drive. If you have a mechanical hard drive and not an SSD, there is a trick that can help you speed up your cache: use the ReadyBoost feature in Windows. It tells Windows to cache data on a USB flash drive, which is faster than a hard drive. Fetching data from this faster cache should speed up Windows.
First, plug a USB flash drive into one of your PC’s USB ports. The flash drive should support at least USB 2.0, and preferably USB 3 or faster. The faster your flash drive, the greater the speed gain you should get. Also, look for a flash drive that is at least twice the size of your PC’s RAM for optimal performance.
After plugging in the drive, open File Explorer and click on “This PC”. Find the flash drive. Right click on it, choose Properties and click on the ReadyBoost tab.
You will be presented with a screen that asks if you want to use the flash drive as a cache and recommends a cache size. Leave the cache size as it is or change it if you wish. Then select “Dedicate this device to ReadyBoost” and click Apply, then OK.
As you use your computer, ReadyBoost will begin to fill the cache with files, so you may notice an increase in disk activity. Depending on how much you use your PC, it may take a few days for your cache to fill up and provide maximum performance improvement. If you don’t see a performance increase, try a larger flash drive.
13. Slowness on Windows 10: Corrupted Windows system files
Another possible cause is that the system has corrupted files. This is a more discreet problem and one that you may not think about at first. Windows 10 gives you two major tools to combat this problem. The first is the Image Deployment Service and Management Tool (DISM). The second is the System File Checker (SFC).
By DISM :
- Type powershell in the Windows search bar. Once the desktop application appears, right click and click Run as administrator.
- Type dism.exe /Online /Cleanup-image /Restorehealth in the window that appears. Press Enter and DISM will start to find the corrupted files and replace them.
By SFC :
- Open PowerShell from the Windows search bar. Make sure you are running it as an administrator.
- Type sfc /scannow and press Enter.
This process will find and replace the corrupted files. When it is finished, restart your PC. If corrupted files were the cause of your slowness, your PC should run much more smoothly.
14. Adjust the size of the virtual memory
Virtual memory is an essential part of Windows 10 to improve performance. If you are experiencing the problem of Windows 10 being very slow and unresponsive, you can try adjusting the size of the virtual memory.
- Type advanced system settings in the Windows 10 search box to open the system properties.
- On the Advanced tab, click Settings under the Performance section.
- Switch to the Advanced tab, click Edit under the Virtual Memory section.
- Click Edit.
- Uncheck the Automatic swap file management for drives checkbox, select the drive, choose Custom size. Then enter the initial size and the maximum size. Finally, click Set and OK to save the changes.
- After that, you will set the virtual memory size for this drive. In order to solve the problem of Windows 10 being very slow and unresponsive, you need to set the manual size for all drives. Then restart your computer to check if the slow computer problem is solved.
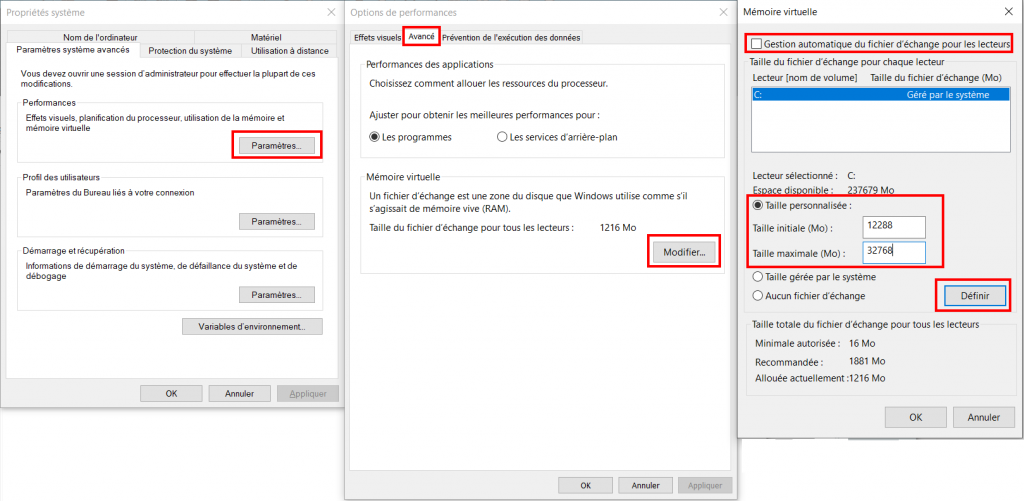
Note: The size of the virtual memory is related to the size of your RAM. As a general rule, the initial size should be at least 1.5 times the amount of RAM on your PC. The maximum size should be up to 4 times the amount of RAM on your PC.
15. Windows 10 is slow: fix 100% disk usage in Windows 10 Task Manager
Another cause of very slow and unresponsive Windows 10 is 100% disk usage. This is a common problem encountered by users because there are too many programs and software running on your PC.
16. Stop the Windows Module Installer service
The problem of slowness on Windows 10 can be caused by the Windows Module Installer service. You can choose to disable the Windows Module Installer service.
- Press the Windows and R keys simultaneously to open the Run dialog box.
- In the window that opens, type services.msc in the box and click OK to continue.
- In the Services window, find the Windows Installer service and double-click it.
- Change its startup type to Disabled, then change its service status to Stopped.
- Click Apply and OK to confirm the changes.
When all the steps are complete, restart your computer and see if the problem is resolved.
Try some of these tips and you’ll find that your Windows 10 PC is faster and less likely to have reliability issues. If none of this works, a system reinstall may be necessary.